Plugin Midicontrol


General information

After downloading the plugin. simple copy the file Midicontrol.hxt into the HXT directory of your A:M installation.
The plugin was originally only meant as faciltation of work for me and lays therefore by far no claim on completeness or accuracy, however it is freeware.Contact address for bug reports,suggestions, thank saying :-) and so one am@sgross.com

Intended purpose

The plugin is meant to control properties of a object in a choreographie or action with an midikeyboard. In addition can be used both the keys, and the different turning/sliding controls or the sustainpedal. The plugin functions however only with pose of the type percent. I have tested this plugin with an Oxygen8 and a mk-49 keyboard.
To the index

Description

The plugin is started with Plugins->Wizards->Midicontrol , while a choreographie or object is selected.
In conjunktion with the selection, it works in a different way.
selected choreographie
the properties from all objects in this choreographie can be controlled
selected object in a choreographie
the properties from this object can be controlled
selected object in a action
the properties from this object can be controlled

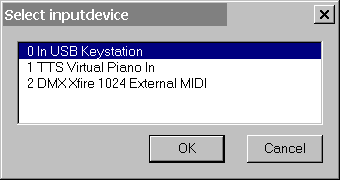
If more than one midiinputdevice should be present in your computer, then you as the first with the following dialogue the selection of the mididevices which can be used is made possible. If only one midiinputdevice is present, this dialogue is not called.
DeviceSelect

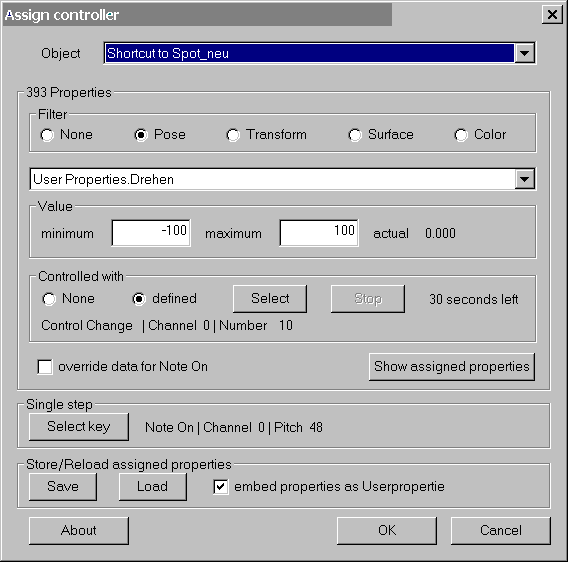
Afterwards the following dialogue indicated for the allocation of the individual poses to the appropriate controller. (In this example the plugin was started with a selected choreographie)
Assign1

We enter now somewhat more exactly with this.

a_object In this listbox you can select a object. Only avaible if the plugin was started from a selected choreographie.
a_filter
Hereby contents of the propertie listbox can be limited to the selected propertiegroups.
a_propertie
Select the propertie , that you want to control.
a_value_color
a_value
As a function of the type of the selected properties hereby either the minimum/maximum color is entered or the minimum/maxima value for the propertie.
a_controlled
Hereby the allocation to the desired midicontroller takes place. The buttons Select and Stop is selectable only if defined is selected .
In order to select a controller, is to proceed as follows defined
select defined
press controllers at the midikeyboard t (, presses, pushes etc. turns/the selected controller in the lower text line is indicated)
press Stop or wait until 30 seconds ran
In order to delete the allocation of a properties to a controller, simply select None .
Also different properties of different objects can be assigned to the same controller.
a_override
If this check box is activated, for all note on events, not the conveyed volume value, is used but the max value set. This is above all helpful with dynamic keyboards, since actually nobody always presses a key with exactly the same impression density, from which different values for the float would result.
This check box applies global, i.e. are treated all note on events here in the same way.
a_view
With this button can you view the current tables of classification of the controllers to the properties indicate.
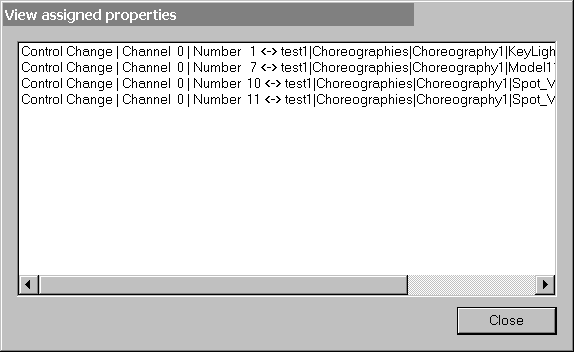
view
a_sstep
Hereby a key of the keyboard can be selected, with which one can run in the record dialogue frame for frame by the choreographie/action. The assignment takes place again with the help of the Select/Stop buttons in the controlled with field.
Difference
only keys can be used
10 seconds limit to select
save_load
If you with the selected allocations are content, can you by means of save a text file provide let, as the allocations are stored, and with the next use of the plugin completely simply again to load.
In version 0.4a now you can store and automaticly reload the assignments if you check the embed checkbox. Than the plugin creates for each assignment a userpropertie with the name "MC" , where it stores the values.

A pressure on OK one brings then finally the last dialogue to light: -)

Before your however Record or Record Single uses here, should bring her as the first your properties on the desired starting position. That is also necessary, if the propertie with the minimum value is to start, since the plugin must receive first a midievent from each assigned controller, in order to manufacture a defined starting situation.
Record
d4frame
the left button set the actual frame to 0
the right button plays the timeline (can be stopped with the Stop button)
In the input field you can select a frame purposefully
At this frame also the keyframes are set if you work with the controllers
With assigned single steps key one can run with this also by the choregraphie/action.
record
Hereby the continuous recording with the selected fps is started
r_sstep
Started the recording in the single step mode.
Helpfully if many controllers are occupied, there one can bring the controllers in peace to the desired value.
r_stop
Only avaible if Record,Record Single or Play is active .
Stopping this actions.
r_delete
If this check box is activated, existing keyframe in the assigned properties are deleted before each Record or Record Single .
r_fps
Here it is specified how often an actualization is to take place, and with records like fast the frames being counted up. The 4.radiobutton (down right) is occupied thereby with the rate stopped in the project under FPS.
With Ok the plugin ended and the created keyframes are stored, ending with Cancel delete the created keyframes and puts back the properties with frame 0 to the value, which had her with the start of the plugin.

To the index


History


To the index

To the pluginindex